With the can craze in full swing, we have more and more customers wanting to add the canning module to their MicroBottler, either when purchasing new or as an addition to their existing machine. We have the only system on the market that allows this, and we are quick to oblige them.
Seaming cans however, is not nearly as simple as crown capping bottles. Variations in cans and can ends require some minor adjustments at times, and unfortunately the only way to truly know if your seams need adjustment is to cut them open and have a look. This will require you to perform measurements and use tools you are not familiar with; but with some study and some practice you can handle this.
The internet is full of information on can seam inspection and, like any information gleaned from the internet, you should be sure to apply your common sense and verify it from several sources before taking it as gospel. Since can specs and lots of inspection information is readily available, I will just run down the way we inspect seams, which we think is a pretty no-nonsense system that anyone can do with a little practice.
There are three items you should buy to properly inspect your can seams:
- Dremel (or similar) tool with a fine-toothed metal cutting blade.
- Vernier/dial/or digital calipers
- Magnification eye loupe
Cans should be inspected periodically or anytime you suspect a problem with your seams.
First and Second operation thickness and height measurements can be taken from outside the can without cutting, so they can be easily monitored.
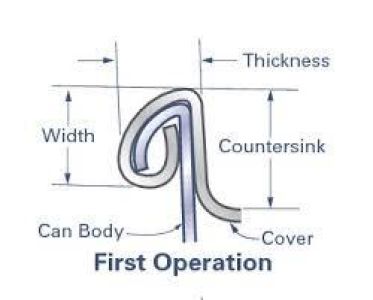
Take a systematic approach to inspecting can seams. Perform only operation one on a can and inspect that operation. Make any necessary adjustments (Lift pressure, operation one roll height and operation one thickness) and re-inspect until you are happy with the results before moving on to inspect operation two.
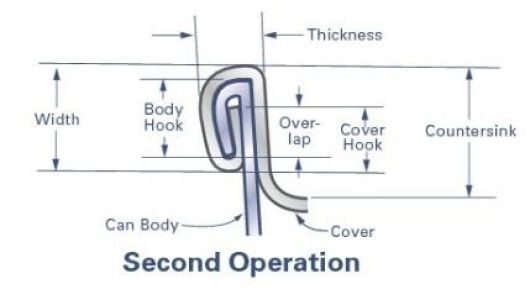
Make any necessary adjustments (operation two roll height and final seam thickness). Good resources for seam component descriptions and troubleshooting tips can be found at www.seamschool.com and www.doubleseam.com. Seam integrity is your responsibility, do not assume that your seams are in spec just because they look good on the outside.
Can seams should occasionally be cut across the seam very carefully using a sharp, fine tooth metal cutting blade. The desire is to have a seam which is viewable under magnification, without having been ground smooth and indecipherable. A dull cutter will melt the aluminum, when cut correctly you will be able to see each layer as in the photos below. A set of calipers can then be utilized under magnification to roughly measure the various seam element dimensions.
Seam thickness should not vary more than .003” around the periphery of the can.
Seams should be smooth with no sharp edges or bumps/roughness present.
The below image is representative of a proper seam profile. There is a layer of sealant applied to can ends at the time of manufacture that will fill the area between the top rim of the cover and top rim of the Can Body (between the top and second layers in these images). It is important that this sealant be sandwiched tightly in this space.


